By Drivio
Updated Feb 25, 2026
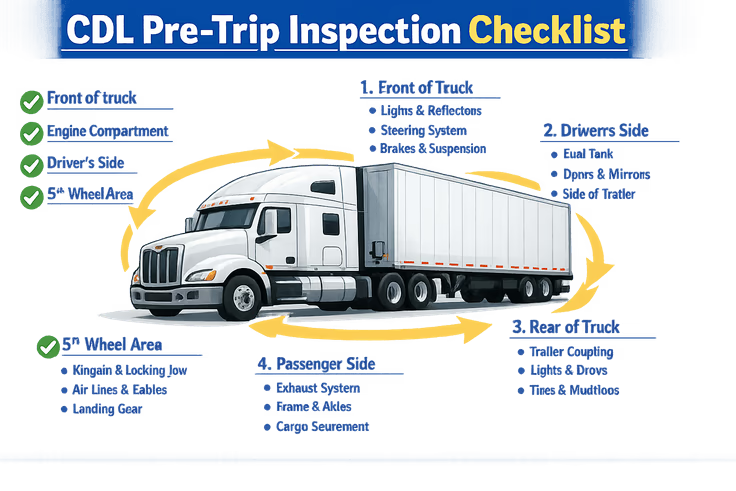
CDL Pre-Trip Inspection: Complete Checklist & Guide

A CDL pre-trip inspection is the walkaround plus in-cab safety check you do before you roll. It’s how you prove you can find problems early—before they turn into a breakdown on the shoulder or something worse.
It matters.
A lot.
On test day, it’s not usually the parts you don’t know that get you—it’s the pressure. Time pressure makes you misread your own thoughts, and suddenly two answers look right, so you start rewriting your wording mid-sentence. Don’t do that. Pick a routine and stick to it.
Out loud.
What Is the CDL Pre-Trip Inspection?
The pre-trip is a structured routine where you identify key components and explain what “good condition” looks like. You’re hunting for leaks, damage, looseness, missing hardware, and anything that makes the vehicle unsafe or illegal.
You typically do it:
- Before operating for the day
- When swapping equipment (like a different trailer)
- After something changes (say you hit a curb hard)
This one trips people up.
On the exam, you’re often graded by sections. Skip a section, miss too many items, or mess up something safety-critical (brakes are the big one), and the score drops fast.
Say it.
Clearly.
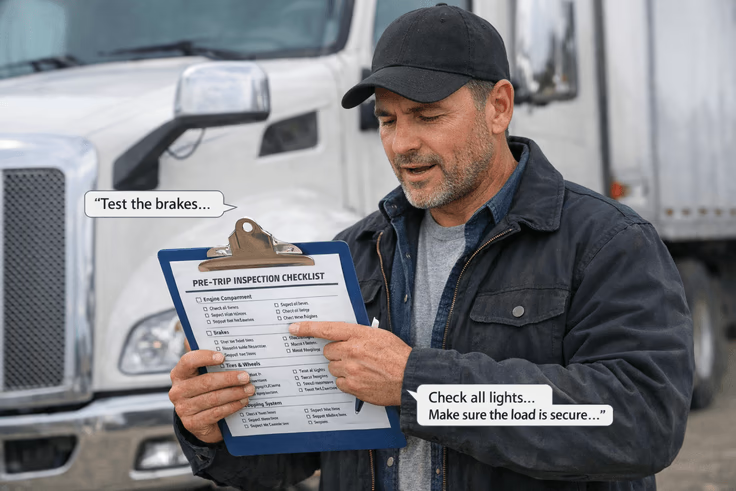
Complete Pre-Trip Inspection Checklist (Step-by-Step)
Treat this as your cdl pre trip inspection checklist, but keep your state’s sheet in mind. Different DMVs and third-party testers sometimes want slightly different wording. The easiest fix is consistency: run the same path every time—front to back, top to bottom—and finish with the in-cab checks.
Slow beats rushed.
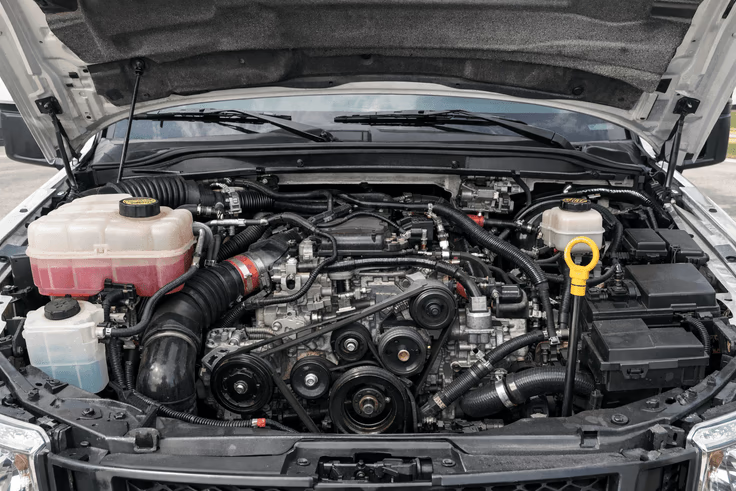
Start at the engine compartment
If your test setup allows the hood to be opened, start there. You’re checking levels, secure mounting, and obvious leaks.
Quick fluid check items usually include:
- Engine oil level (proper level, no contamination)
- Coolant level (only when safe; don’t open a hot system)
- Power steering fluid (proper level, no leaks)
This one trips people up.
Now look at things people forget because they’re not “shiny” parts. Belts should look healthy and feel properly tensioned, hoses shouldn’t be wet or cracked, and wiring shouldn’t be rubbing through.
Common under-hood callouts:
- Belts/hoses: not cracked, frayed, or leaking
- Leaks: look for drips, wet fittings, or puddles under the engine
- Battery area (if accessible): secure, cables tight, no heavy corrosion
This one trips people up.
If you can see steering components, name them and state the condition you want: secure mounting, no missing bolts, no leaks from hoses or the gearbox. If you can’t see a component, don’t invent it—just move on.
Don’t guess.
Move to the front of the vehicle
From the bumper area up to the windshield, your job is basically: nothing broken, nothing missing, nothing dangerously loose.
Front items to hit:
- Windshield: clean, no illegal cracks; wipers not torn and mounted properly
- Mirrors: mounted, not cracked, adjusted
- Headlights/turn signals: lenses clean, not broken, securely mounted
This one trips people up.
If you want to sound like you’ve done this in real life (because you should), add one extra beat: “No debris blocking airflow at the grille, and the bumper is secure.” Short. Confident.
Walk the driver side, then the passenger side
Pick a side and commit. Most people go driver side first because it’s natural.
Driver-side basics:
- Door: opens/closes properly; hinges secure; seal intact
- Steps/handholds: solid, not bent, not slick
- Fuel tank/cap: straps secure, cap tight, no leaks
This one trips people up.
After that, keep your eyes scanning along the frame line. If there’s a battery box mounted on the side, it needs to be secure and closed. If there’s an exhaust section running along the side, it shouldn’t be dragging, contacting anything important, or showing black soot trails that suggest a leak.
You’re also watching for suspension issues as you go—broken spring leaves, shifted U-bolts, leaking airbags (if equipped). And yes, say “no leaks” even when it feels repetitive, because that phrase earns points.
Stay steady.
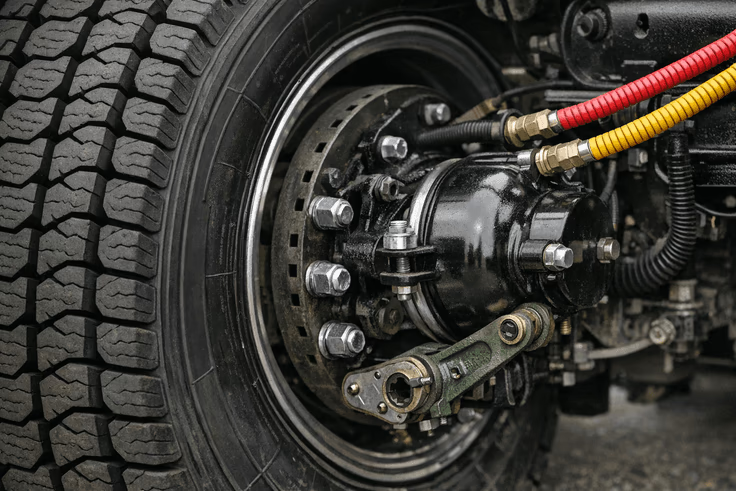
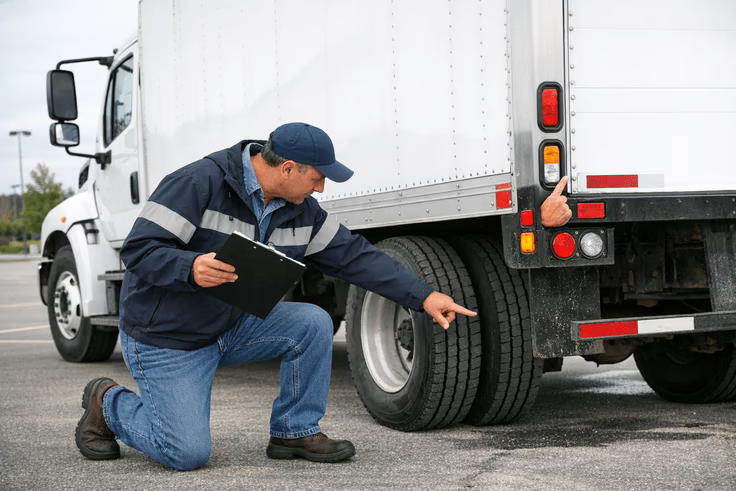
Tires, wheels, and brakes (don’t rush this)
Examiners pay attention here because tires and brakes are where small neglect becomes big trouble. Use simple condition language and repeat it the same way every time.
Tire/wheel hits:
- Tire: properly inflated; no cuts, bulges, or exposed cords
- Tread: at/above minimum (steer axle standard is usually higher)
- Rim/lug nuts: no cracks/bends/welds; no missing lugs; no rust trails
This one trips people up.
Then move to what you can see of the brake assembly. You’re looking for secure mounting and no air or fluid leaks, plus obvious damage.
Brake components (visible check):
- Hoses/lines: not worn, cracked, or leaking; no rubbing points
- Brake chamber: secure, not dented, not leaking
- Slack adjuster/pushrod: secure; travel within limits when applied (state-specific)
This one trips people up.
One detail many people miss: routing. If an air line is rubbing on a bracket, it’s a future failure. Point it out as something you’re checking for.
Lights and reflectors as you go
You’ll often “touch” lights during the walkaround and confirm operation during the in-cab portion. Your wording can be simple: correct color, clean lens, not cracked, securely mounted, working.
Common light items:
- Clearance/marker lights: present, clean, not broken
- Reflectors/reflective tape: present and in decent condition
- Signals: lenses intact; will verify operation in-cab
This one trips people up.
If you’re pulling a trailer, you’ll keep that same mindset all the way down the side and at the rear: side markers, rear lamps, the high rear ID lights, and reflective tape.
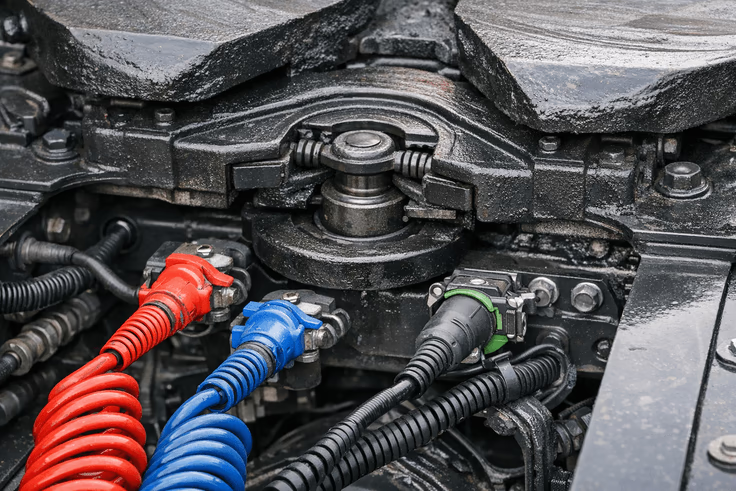
Coupling system (only if applicable)
Not everyone tests on a full combination setup, but if you do, this section is non-negotiable. Even some “mostly Class B” situations can involve a trailer or hitch, so know what you’re driving.
Coupling basics to verbalize:
- Mounting: secure, no cracks, no missing hardware
- Locking mechanism: fully engaged; safety lock/pin in place
- Air/electrical: lines secure, not dragging, no leaks; seals in good shape
This one trips people up.
If you have safety chains or a breakaway cable, say they’re properly attached, not frayed, and have enough slack for turning but not so much they drag.
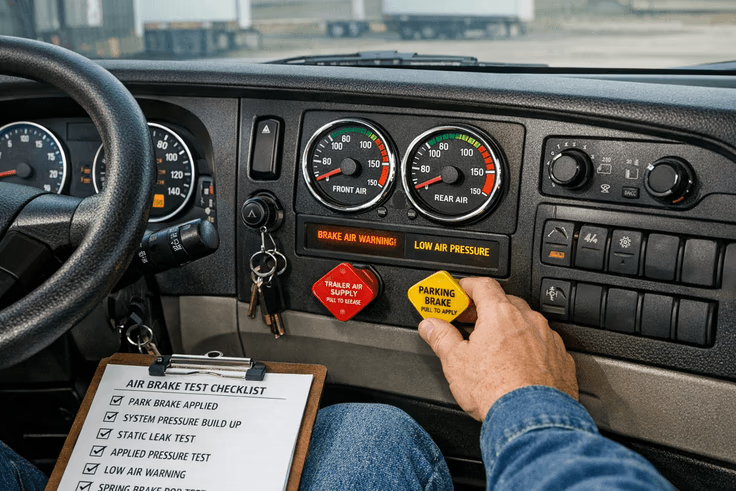
Finish in the cab (and do the brake tests in order)
This is where a lot of people lose points, because they get comfortable once they sit down. Don’t.
In-cab essentials:
- Seat belt: latches, adjusts, not frayed
- Gauges: oil pressure rises; voltage normal; air builds properly
- Safety gear: charged fire extinguisher; triangles; fuses if required
This one trips people up.
Now the air brake checks (if you’re in an air brake vehicle). Do them the same way every time, and narrate what you’re doing.
First, build air pressure to governor cut-out range. Then do your applied pressure/leak test per your state’s procedure (engine off if required, key on if needed). Hold the service brake and watch for excessive air loss.
Next, fan/pump the brakes to confirm the low-air warning activates (light/buzzer). Keep pumping to confirm the spring brakes pop out. Then do a parking brake tug test (gently) to confirm it holds. Finally, roll forward slowly and apply the service brake to confirm the vehicle stops smoothly and doesn’t pull.
Brake tests count.
Every time.
Differences for Class B Vehicles
The cdl pre trip inspection class b version is often simpler because many Class B vehicles are single-unit. That usually means no fifth wheel, no kingpin, and fewer coupling-airline explanations.
But don’t confuse “simpler” with “easy.” You still have to nail the same safety-critical areas: tires, wheels, steering, suspension, lights, and brakes. If it’s a bus, you may also need to cover passenger safety items like emergency exits, aisle condition, and door operation.
Same standards.
Different hardware.
If you’re in a straight truck, be ready to describe the cargo area basics too (secure body, no loose panels, and anything load-related your examiner expects).
How the Pre-Trip Inspection Test Works
During the cdl pre trip inspection test, the examiner is listening for two things: that you name the part, and that you state what condition you’re checking for. “Secure, not damaged, no leaks” gets you surprisingly far, as long as you apply it to the right components.
Most testers want to see that you:
- Follow a logical path and don’t skip major sections
- Identify parts and describe safe condition
- Catch obvious safety defects if they’re present
This one trips people up.
Time limits vary, and that’s where people start tripping over wording. You’ll hear yourself thinking, “Is it ‘must’ or ‘may’?” and suddenly you’re bargaining with the clock. Keep your language plain and consistent. You’re not writing a manual; you’re proving you can operate safely.
Also, understand the general scoring vibe: missing a few minor items might be okay, but skipping brake checks or declaring an unsafe condition “good to go” can be a deal-breaker.
How to Remember the Inspection Steps
If you’re Googling how to remember the cdl pre trip inspection, the best answer is boring on purpose: memorize a route, not a random list. A route doesn’t change under stress.
Three memory anchors that actually work:
- Front to back, then in-cab
- Top to bottom on each section
- Use one script: “secure, not damaged, no leaks”
This one trips people up.
Practice by doing the exact same order daily, and say it out loud even when it feels corny. If you don’t have access to a commercial vehicle every day, walk around your personal car and “pretend point” to parts. You’ll still build the speaking rhythm, which is half the battle.
Boring is good.
Common Mistakes to Avoid
A few mistakes show up constantly, especially when someone “knows it” but hasn’t practiced under a timer.
Big repeat offenders:
- Skipping or scrambling the in-cab brake checks
- Pointing without naming the part and the condition
- Only checking the driver side and mentally “assuming” the passenger side
This one trips people up.
Other common leaks in the routine: forgetting to mention tread depth, ignoring rubbing air lines, mixing up marker vs clearance vs identification lights, and finishing without clearly stating whether the vehicle is safe to operate.
One more: talking yourself into trouble. If you catch yourself rambling, go back to the basics—name it, condition it, move on.
Short and clean.
Conclusion
The CDL pre-trip isn’t about sounding fancy. It’s about being consistent, thorough, and calm when the pressure hits. Follow a steady route, use simple condition language, and practice until you can do it without thinking.
Run your checklist once a day for a week. Then do it again, a little faster, without cutting corners. That’s how the routine sticks—and that’s how you walk into the exam ready.
Ready to join
Resources
Road Signs© 2026 Drivio DMV Practice Tests